![]()
![]()
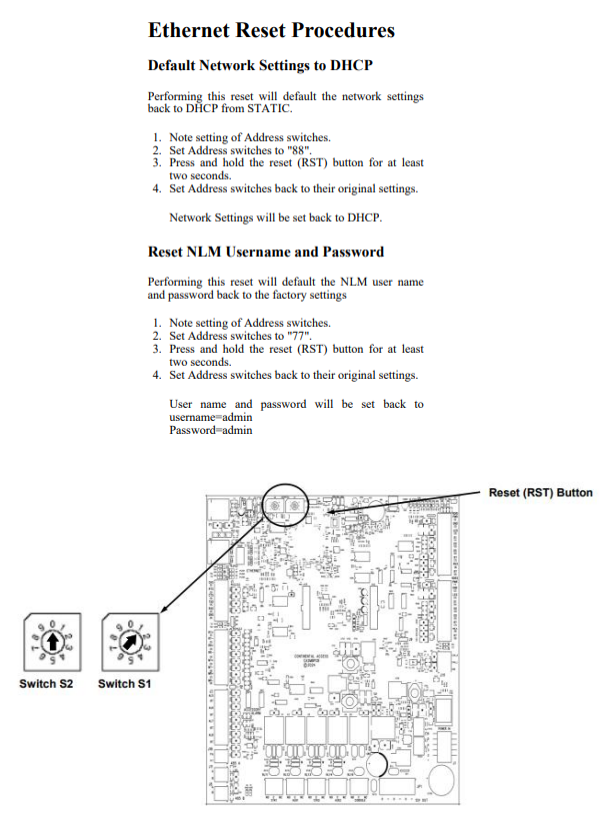
➡️Reset Procedure for the NA-1
➡️Reset Procedure for the NA-2
➡️Reset Procedure for the CA-2 / CA-4
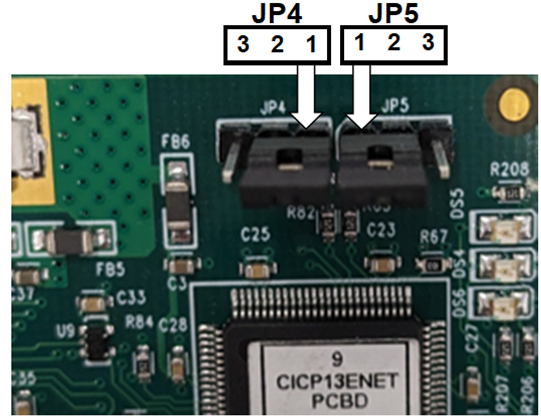
➡️Reset Procedure for the CICP1300NETBD2 (CICP1300 Super 2)
JP4 (Configure for DHCP Request)
Follow this procedure to remove all current network settings and revert back to the default DHCP configuration. This will clear the existing IP address information and reset the controller to request an IP address automatically using DHCP.
1. Set both JP4 and JP5 to pins 1-2 (Do not press Reset)
2. Move jumper JP4 to positions 2-3.
3. Press the Reset button on controller for 3-5 sec.
4. Wait 30 seconds for the green/red LEDs to stop flashing.
5. Replace jumper JP4 to positions 1-2. (or If using cloud mode leave JP4 on 2-3, and just move JP5 back to pins 2-3)
6. The controller will obtain a new IP address from DHCP.
JP5 (Reset Universe Finder Utility Username and Password)
The following procedure is used reset the uniVerse Finder utility Username and Password back to the default of "admin" and "admin"
1. Set both JP4 and JP5 are set to pins 1-2 (Do not press Reset)
2. Move jumper JP5 to positions 2-3.
3. Press the Reset button on controller for 3-5 sec.
4. Wait 30 seconds for the green/red LEDs to stop flashing.
5. Replace jumper JP5 to positions 1-2. (or If using cloud mode leave JP5 on 2-3, and just move JP4 back to pins 2-3)
6. The Username and Password will be reset to "admin" and "admin".
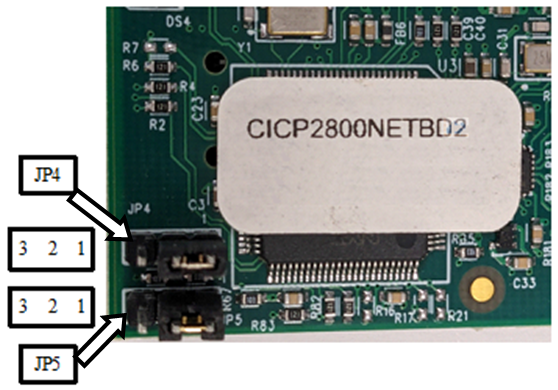
➡️Reset Procedure for the CICP2800NETBD2 (CICP2800 / Accelaterm / Accelerator)
JP4 (Configure for DHCP Request)
Follow this procedure to remove all current network settings and revert back to the default DHCP configuration. This will clear the existing IP address information and reset the controller to request an IP address automatically using DHCP.
1. Set both JP4 and JP5 to pins 1-2. (Do not press Reset)
2. Move jumper JP4 to positions 2-3. (Note: JP5 must be on the right two pins 1-2)
3. Press the Reset button on controller for 3-5 sec.
4. Wait 30 seconds for the green/red LEDs to stop flashing.
5. Restore jumper JP4 to positions 1-2. (or If using cloud mode leave JP4 on 2-3, and just move JP5 back to pins 2-3)
6. The controller will obtain a new IP address from DHCP.
JP5 (Reset Universe Finder Utility Username and Password)
The following procedure resets the Web utility Username and Password back to their defaults ("admin" and "admin").
1. Set both JP4 and JP5 to pins 1-2 (Do not press Reset)
2. Move jumper JP5 to positions 2-3. (Note: JP4 must be on the right two pins 1-2)
3. Press the Reset button on controller for 3-5 sec.
4. Wait 30 seconds for the green/red LEDs to stop flashing.
5. Restore jumper JP5 to positions 1-2. (or If using cloud mode leave JP5 on 2-3, and just move JP4 back to pins 2-3)
6. The Username and Password is reset to "admin" and "admin".
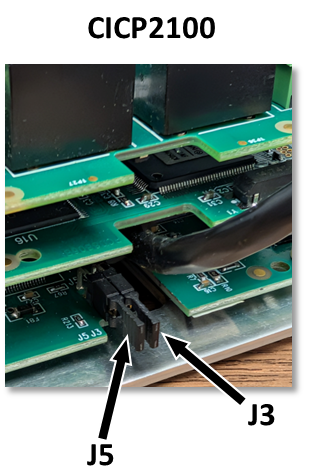
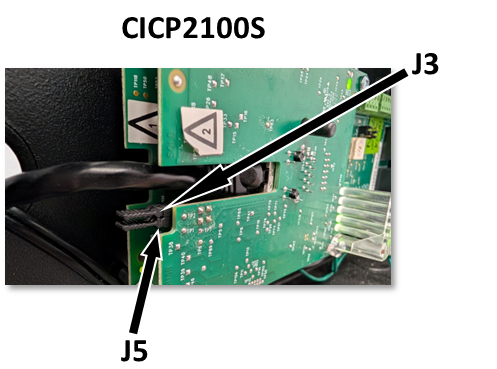
➡️Reset Procedure for the CICP2100 / CICP2100S
J3 (Configure for DHCP Request)
Follow this procedure to remove all current network settings and revert back to the default DHCP configuration. This will clear the existing IP address information and reset the controller to request an IP address automatically using DHCP.
1. Remove both J3 and J5 OFF. (Do not press Reset)
2. Install jumper J3 (IN).
3. Press the Reset button on controller for 3-5 sec.
4. Wait 30 seconds for the green/red LEDs to stop flashing.
5. Remove jumper J3 (If using cloud mode, leave J3 IN, and reinstall jumper J5 back IN so that both jumpers are IN)
6. The Controller will obtain a new IP address from DHCP.
J5 (Reset Universe Finder Utility Username and Password)
The following procedure is used reset the Username and Password back to the default of "admin" and "admin"
1. Remove both J3 and J5 OFF. (Do not press Reset)
2. Install jumper J5 (IN).
3. Press the Reset button on controller for 3-5 sec.
4. Wait 30 seconds for the green/red LEDs to stop flashing.
5. Remove jumper J5 (If using cloud mode, leave J5 IN, and reinstall jumper J3 back IN so that both jumpers are IN)
6. The Username and Password will be reset to "admin" and "admin".