Important: Before proceeding, please confirm that the doors have been activated on Napco's Remote Service Platform. For activation assistance, contact your MVP Access dealer directly.
Click to see a list of supported Continental Access Controllers: Controller Support
For information on Migrating Controllers from CA4K or from Factory to MVP, please refer to Controller / CA4K Migration to MVP
We’re excited to announce that our controllers and Ethernet adapters now feature an innovative Cloud Mode Select Jumper! This powerful new feature allows you to easily switch between Standard On-Premises CA4K Server Mode and Cloud Mode for MVP Access, providing greater flexibility for your access control setup. See the table below for full compatibility details.
Important Notes:
Check for required jumpers first—as they may not be supplied. Jumpers are supplied by customer service at no cost if needed.
To enable the Cloud Mode Select Jumper functionality on the CICP2100/CICP2100S (uniVerse), an Ethernet firmware update is required.
To enable the Cloud Mode Select Jumper functionality on the CICP1300 (Super 2) and CICP2800 (Accelaterm), a Net Board 2 must be installed. Additionally, the CICP1300 requires both an ethernet and panel firmware update or you can order part # CICP1300MVPKIT (Call for availability, coming soon).
1. Start by locating your Controller/Ethernet Adapter Model # in the table below—then follow the directions listed in the Instructions column in the middle of the table.
| Controller / Ethernet Adapter | Instructions | Steps to Set Jumper (s) to MVP Cloud Mode |
|
CA-1 (Coming Soon!)
|
✅MVP Cloud Ready ☁️
1. Follow steps to Set the Jumper to MVP Cloud Mode.
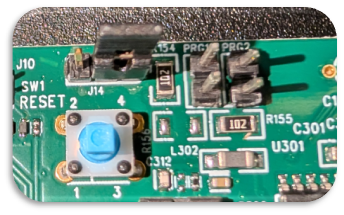
2. Press the Reset button for 3-5 Seconds
3. Then follow the steps below on "II. Adding the Controller to the MVP Access Cloud Portal " |
By default the controller is set to Standard mode (JP9 and JP10 Jumpers Set to the Left two pins ON) for on-premise CA4K server support.
To Enable Cloud Mode: 1. Move the JP9 and JP10 Jumper both to the right two pins and leave the jumpers there.
2. Press the Reset Button for 3-5 seconds or Power Cycle the controller.
To Enable Standard CA4K Server Mode: 1. Move the JP9 and JP10 Jumper both to the left two pins and leave the jumpers there. 2. Press the Reset Button for 3-5 seconds or Power Cycle the controller. |
|
CA-2 / CA-4 |
✅MVP Cloud Ready ☁️
1. Follow steps to Set the Jumper to MVP Cloud Mode.
2. Press the Reset button for 3-5 Seconds
3. Then follow the steps below on "II. Adding the Controller to the MVP Access Cloud Portal " |
By default the controller is set to Standard mode (J14 Jumper set to the Left two pins ON) for on-premise CA4K server support.
To Enable Cloud Mode: 1. Move the J14 Jumper to the right two pins and leave the jumper there. 2. Press the Reset Button for 3-5 seconds or Power Cycle the controller.
To Enable Standard CA4K Server Mode: 1. Move the J14 jumper to the left two pins and leave the jumper there. 2. Press the Reset Button for 3-5 seconds or Power Cycle the controller. |
|
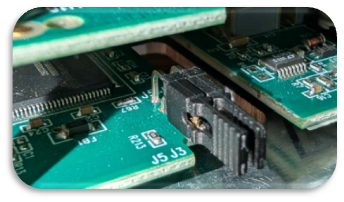
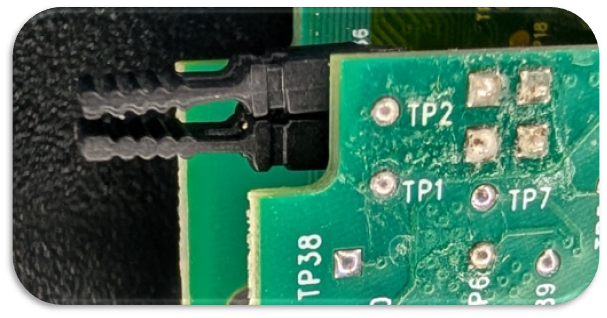
CICP2100S / CICP2100 |
⬆️ Supports MVP Cloud — ethernet firmware update required. 🎞️ Watch the Video Tutorial here!
1. An ethernet firmware update is required. Requires v.14.6.11 or higher. Follow the steps on Updating Controller (Ethernet) Firmware, using Universe Finder Utility Software.
2. Once updated, follow steps to Set the Jumper to MVP Cloud Mode.
3. Press the Reset button for 3-5 Seconds
4. Then follow the steps below on "II. Adding the Controller to the MVP Access Cloud Portal " |
By default the controller is set to Standard mode (J5 and J3 Jumpers OFF) for on-premise CA4K server support.
To Enable Cloud Mode: 1. Install a Jumper onto both the J5 and J3 pins and leave the jumpers there. CICP2100 CICP2100S
2. Press the Reset Button for 3-5 seconds or Power Cycle the controller.
To Enable Standard CA4K Server Mode: 1. Remove the two Jumpers installed on J5 and J3 pins and leave the jumpers off. 2. Press the Reset Button for 3-5 seconds or Power Cycle the controller. |
|
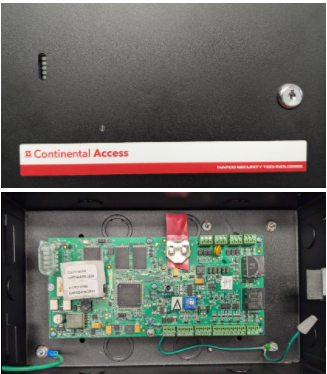
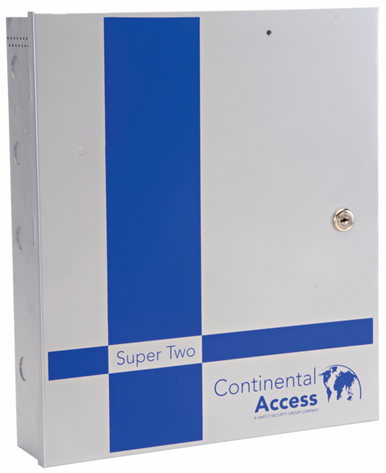
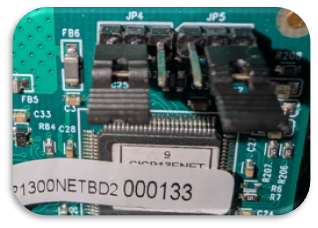
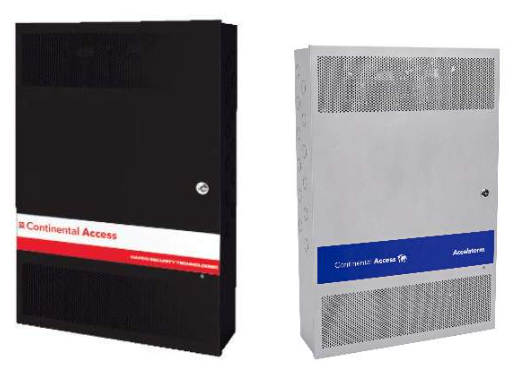
CICP1300 (Super 2) (Requires a CICP1300NETBD2) |
⬆️ Supports MVP Cloud—requires the CICP1300NETBD2 ethernet module and firmware updates/verification or order part # CICP1300MVPKIT, no firmware updates required (Coming soon, call for availability). 🎞️ Watch the Video Tutorial here!
1. Install a CICP1300NETBD2 or order a CICP1300MVPKIT and skip to step 5.
2. A panel firmware update is required. Requires v.04.02.42 or higher. Follow the steps on Updating Controller (Panel) Firmware, using Universe Finder Utility Software.
3. An ethernet firmware update/verification is also required. Requires v.17.10.1 or higher. Follow the steps on Updating Controller (Ethernet) Firmware, using Universe Finder Utility Software.
4. Once both firmware's are updated, follow steps to Set the Jumper to MVP Cloud Mode.
5. Press the Reset button for 3-5 Seconds
6. Then follow the steps below on "II. Adding the Controller to the MVP Access Cloud Portal " |
By default the controller is set to Standard mode (JP4 Jumper Set to the Right two pins ON and JP5 Jumper set to the Left Two Pins ON) for on-premise CA4K server support.
To Enable Cloud Mode: 1. Move the JP4 Jumper to the Left two pins ON and move JP5 Jumper to the Right Two Pins ON and leave them there.
2. Press the Reset Button for 3-5 seconds or Power Cycle the controller.
To Enable Standard CA4K Server Mode: 1. Move the JP4 Jumper to the Right two pins ON and move JP5 Jumper to the Left Two Pins ON and leave them there. 2. Press the Reset Button for 3-5 seconds or Power Cycle the controller. |
|
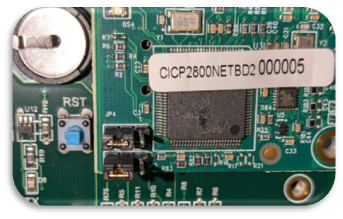
CICP2800 (Requires a CICP2800NETBD2) |
✅MVP Cloud Ready ☁️ — requires ethernet module, CICP2800NETBD2.
1. Install a CICP2800NETBD2
2. Follow steps to Set the Jumper to MVP Cloud Mode.
3. Press the Reset button for 3-5 Seconds
4. Then follow the steps below on "II. Adding the Controller to the MVP Access Cloud Portal " |
By default the controller is set to Standard mode (JP4 and JP5 Right two pins ON) for on-premise CA4K server support.
To Enable Cloud Mode: 1. Move the JP4 and JP5 Jumper both to the Left two pins ON and leave the jumpers there.
2. Press the Reset Button for 3-5 seconds or Power Cycle the controller.
To Enable Standard CA4K Server Mode: 1. Move the JP4 and JP5 Jumper both to the Right two pins ON and leave the jumpers there. 2. Press the Reset Button for 3-5 seconds or Power Cycle the controller. |
Important: In order to proceed and add the Continental Access Controller with the MVP Access Cloud portal, the controllers / ethernet adapters must configured to cloud mode.
Configure the Com Port:
1. Go to Configuration > Com Ports and Click Add to add new device.
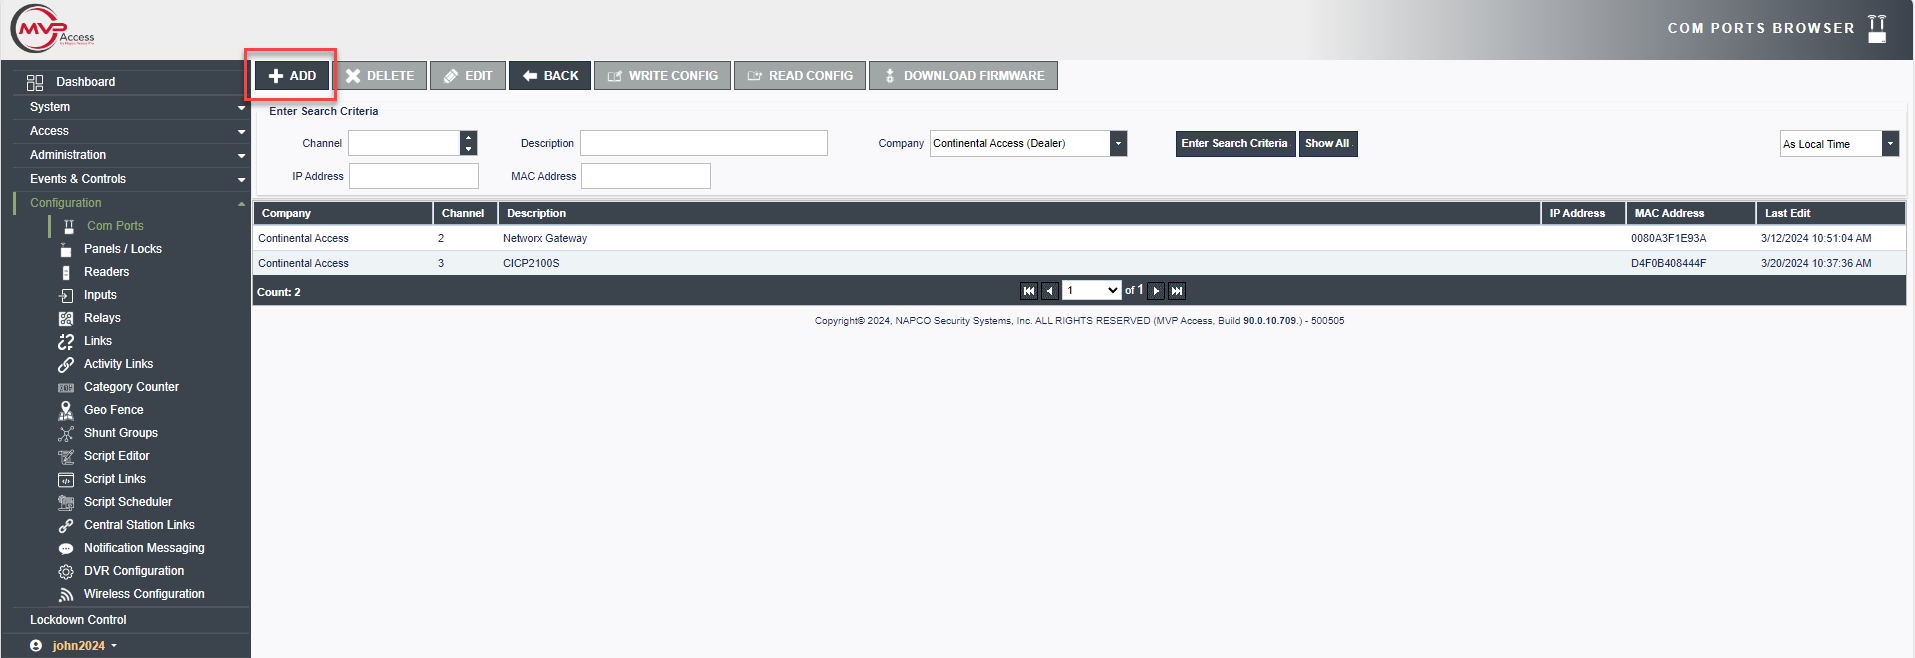
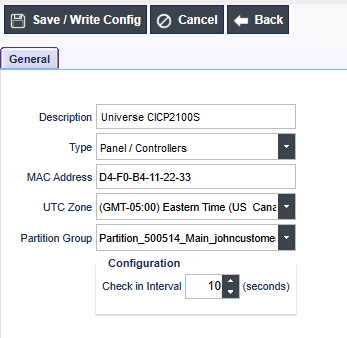
2. Enter the following required information then press Save/Write Config.
a. Description: <Enter a ComPort Description>
b. Type: <Select Panel/Controllers>
c. MAC Address: <Enter the Controllers Ethernet MAC Address located on a sticker on the controller or ethernet adaptor>
d. Select the UTC Zone
e. Select Partition Group or leave as the default Main Partition
f. Leave the Configuration setting at default values
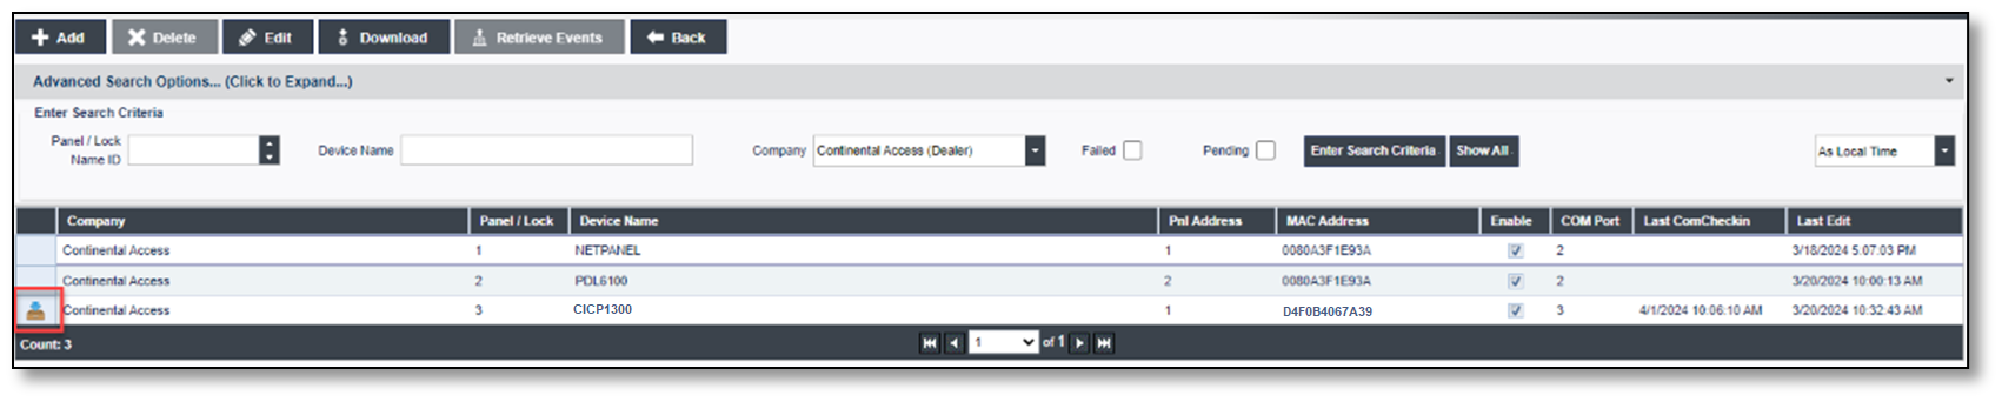
Configure the Panel:
3. Go to Configuration > Panel / Locks and then Click Add.
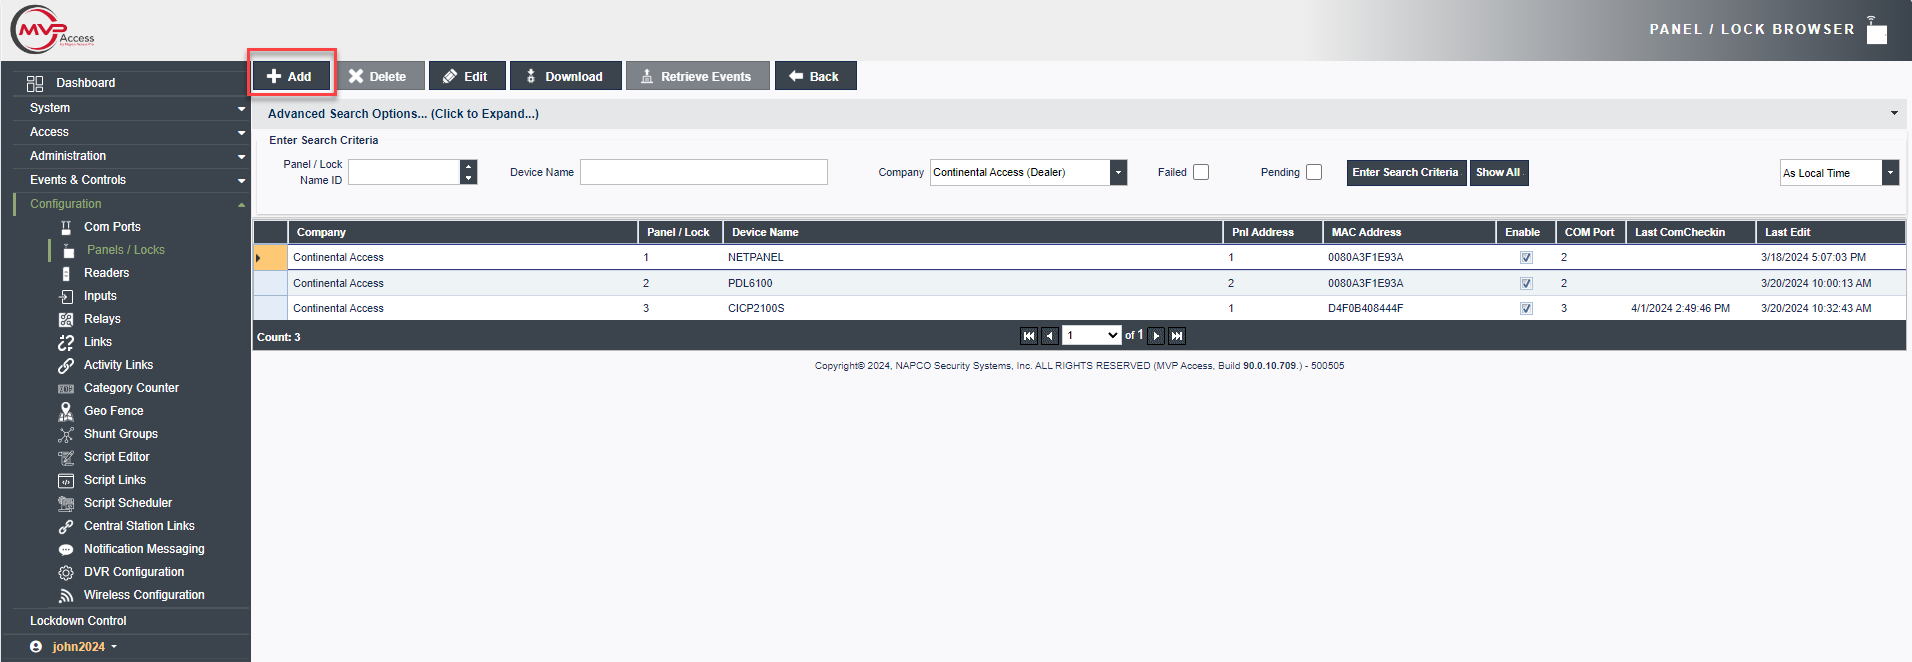
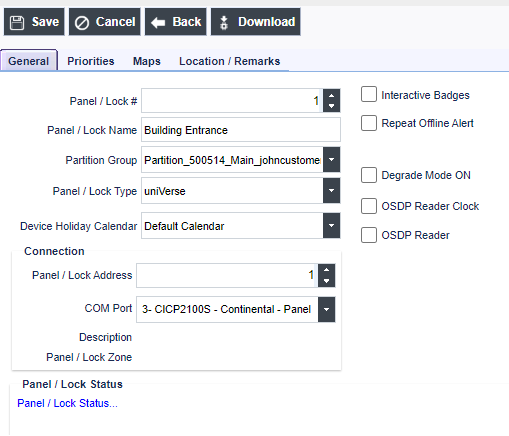
4. Enter the following required information then press Save.
a. Panel/Lock #: <The next sequential Panel/Lock # will automatically populate, leave at default value or change if needed >
b. Panel/Lock Name: <A Name for the Panel / Lock >
c. Partition Group: <Defaulted to Main Partition, leave at default or change if needed)
d. Panel/Lock Type: <Select the Controller Model Type>
e. Device Holiday Calendar: <Defaulted to Default Calendar, leave at default or change if needed>
f. Panel/Lock Address: <Select the Controllers Address, Default = 1 > (Important: Controller Address must match the Panel/Lock address and be set to an address other than "0")
g. COM Port: <Select the Com Port from the drop down which was configured in Com Ports>
5. The Auto Creation of Reader Devices pop up will display. Select the number of Readers (Doors) you will be using on the controller then press Ok. (Note: By default, newly created readers will automatically be assigned to the default access group “All Door Access”)
6. After the panel is configured, the panel will request cloud firmware from the server in the background. Initially, the panel row on the Panel / Lock Browser page will display the panel row with Red text.

7. Wait until the panel text becomes Blue and the "Download Icon" disappears. This process can take a few minutes as it updates firmware and configures to the cloud. Please view the Command Status or Refresh the page to update the screen.
Note: If you have a CICP1300 this process may take up to 10 minutes depending upon network speed.
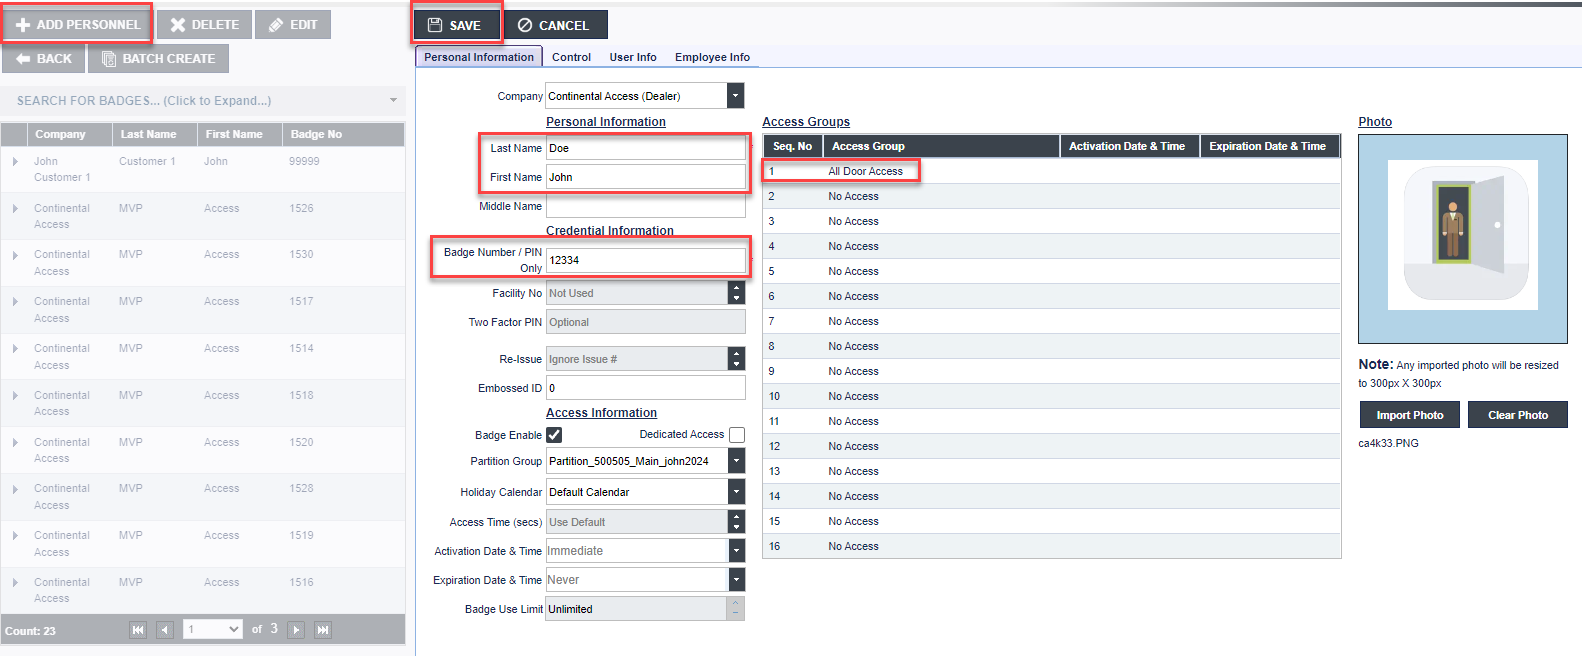
8. You are now ready to Configure a Badge. Go to Access > Personnel and Click + Add Personnel.
9. Enter the values below into the required fields. Then Press Save.
a. Last Name: <Person’s Last Name>
b. First Name: <Person’s First Name>
c. Badge Number / PIN Only: <Enter a Badge Number>
d. Access Groups: <Select Access Group from available list. by default, "All Door Access" is selected >
For more details on adding Personnel please see Personnel
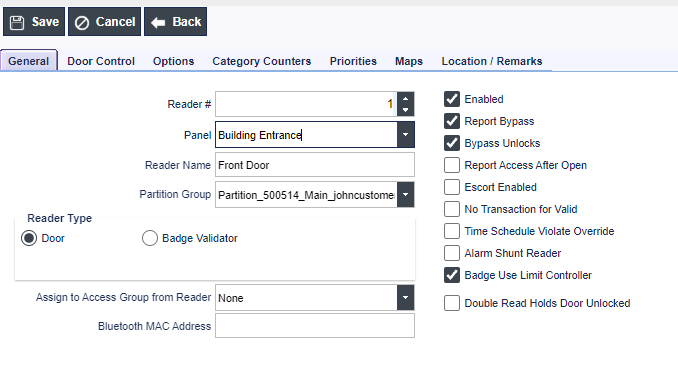
To Manually Add a Door (Reader)
1. Click on Configuration > Readers and then click Add.
2. On Reader Insert/Update page, Select the Panel from the drop down and then enter a Reader Name.
3. Once values are set, click Save.
Note: By default, newly created readers will automatically be assigned to the default access group “All Door Access”.